Xero Journal
Follow this guide to add an automated report submission which will post a journal into Xero cloud bookkeeping on an approved pay run.
First you will need to add a new Xero journal Report Definition:
Navigate to Report Definition
Click Add…
Select your Company
For the Template select GB Xero Journal
Click Add.. noting at this stage you do not need to enter any data in Settings. You can also ignore any errors in red.
Next you will need to authorise paiyroll® from your Xero account:
Navigate back to Report Definition
Update the Xero Journal report just added.
You will now see a new pair of buttons: Grant… Revoke
Click Grant…
On the next screen you may be asked to log into your Xero account if you are not already logged in.
On the next screen Xero will ask you which Organisation you would like to grant access to paiyroll®
Select the Organisation and click on Allow access
Now that your Xero organisation is connected, you can proceed to configure your journal:
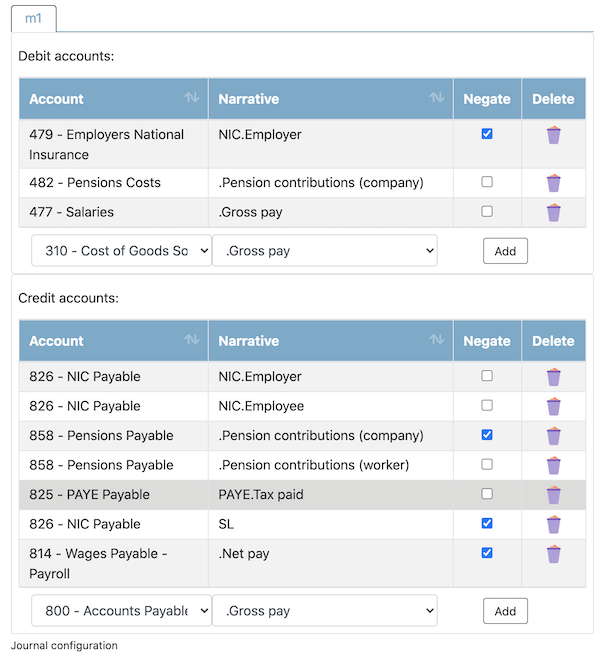
In Settings you will need to carefully configure each journal Debit or Credit entry as required.
You may need to delete any default entries that do not match your journal.
In the drop-down boxes select each Xero account and match it with a paiyroll® Buss or Pay Definition. paiyroll® stores most deductions as negatives (e.g. worker pension deductions) and other values as positives (e.g. company pension contributions). Xero expects all Debits to be positive and all Credits to be negative. Tick the Negate if you need to switch a positive to a negative or vide versa. Click Add to move the new entry into the Debit or Credit list. Repeat until every entry has been added for Debit and Credit accounts. Any errors can be easily corrected by using the delete icon. An example configuration is below.
Ensure you click Update… to save your changes.
Repeat to separately configure each frequency.
Finally check if the report has been correctly configured:
Ensure there are no errors by clicking View to view the pay run.
Click Reports tab.
Click anywhere in the row GB Xero Journal avoiding the text to see a summary below of your journal together with Debits and Credits that will be posted.
If you see any errors, then the report has not been configured correctly. Likely causes are that one of the Debits or Credits has the incorrect sign and needs to be negated. Other issues are that there may be a missing entry.
Repeat this step until there are no errors; repeat if you have multiple frequencies e.g. weekly and monthly.
Your Xero journal Report Definition is now ready. Every time you approve a pay run, a journal will be posted automatically to Xero. Posted paiyroll® journals can be found in Xero:
Note
If you ever need to disconnect paiyroll® from Xero, click the Revoke button in the report definition.